Sunday, October 7, 2012

P.P.B.C.C.B

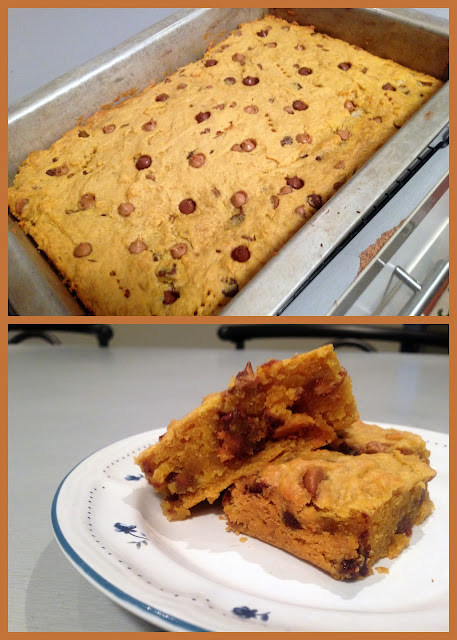
Pumpkin Peanut Butter Chocolate Chip Brownies
That's a mouth full.


'Tis the season to eat your weight in pumpkin.
So, here is another pumpkin recipe!


2 cups flour
1 cup sugar
1/2 cup brown sugar
1 tsp baking soda
3/4 tsp salt
1 cup butter (2 sticks)
1 egg
2 tsp vanilla
1 can pumpkin
1 tbsp pumpkin pie spice
Any cups chocolate and PB chips!

Bake at 350 for 45 mins!

Add a can of pumpkin to anything!
It is seriously delicious.
A can o' pumpkin and brownie mix??
Yeah, It's good.

Wednesday, October 3, 2012

Squash N' Cheese

I'm in college. So, I am always looking easy dinners. But I still want those easy dinners to look a touch on the fancy side. I went to my local farmers market the other day and picked up my favorite fall veggie, acorn squash. Any kind of squash is my favorite but I la la love acorn squash. My mom always made it with some butter and cinnamon. Yum.

When it came to be dinner time, I stared at the cabinet looking for something to eat. My choices were slim. Noodles, noodles or canned corn. Maybe both. I spotted the box of white cheddar mac n' cheese and this is what happened next!

Mac n' Cheesy squash

Well...not really. 
Next you cut the acorn squash, scoop out all the junk (seeds) in the middle and bake the halves for about 45 minutes at 400 degrees. 
While you're towards the end of the 45 minutes, start the mac n'cheese. Once that's ready just scoop it into your acorn squash bowl, throw bread crumbs on the top and bake for another 10-15 minutes. 

Enjoy this easy & college-fancy treat!

Sunday, September 30, 2012

Pop, Pop, Pop.


What you need:
  • Any boxed or homemade cake.
  • Any icing!
  • Candy pieces for candy coating (Found at craft stores)
  • A piece of Styrofoam
  • Candy sticks
  • Sprinkles or any decorations you want to use
  • A hell of a lot of patience.

First, bake that cake! I used strawberry cake mix. 
After the cake is done, mash it all up
and add a whole container of frosting
(I used cream cheese frosting).
 This part is messy but yummy, quite yummy.
 After mashing up all that deliciousness, 
roll the mixture into small cake balls.

Now, melt the candy pieces that will be the
"icing" for the pops. Just pop those
the pieces in a bowl and microwave them.
After that's done take the 
sticks and dip them in the candy and put them into the pops.
Let them dry!

After they dry...start icing. Just dip them into the melted candy coating! 
Stick them all into a piece of Styrofoam to dry.
(Make sure you go for a thick piece, mine kept falling through!).
Decorate!


Morpheous was jealous he didn't get to try any.

FYI!!
They are very time consuming. The whole process took me at least two hours! Make sure you have a lot of time for your first attempt at these. But the end result is sooo worth it, I promise!
...and fattening..shh. Don't tell your pants.


Thursday, September 27, 2012

Thrifty Prints


Three of my favorite items
 .... all from thrift stores! 
 The button-downs look like they could be from Urban Outfitters!
The dress is Charlotte Russe.
All together they cost about $10
You can't beat that!

Saturday, September 22, 2012

Perfectly Pumpkin Muffins


It's officially Fall!
I love this season for many reasons.
I love boots, Thanksgiving naps and eating pumpkin-y treats whenever humanly possible.
That is why I decided to make:
Chocolate Chip Pumpkin Muffins!

These are extremely easy to make! All you need is:
Yellow Cake Mix (Nothing added...just the mix!)
1 can of pumpkin
1 cup of brown sugar
1 table spoon vanilla

Bake at 350 degrees for about 25 mins.

I glazed my perfectly pumpkin muffins with a brown sugar glaze!
Glaze:
1 cup of confectioners sugar
1/4 cup of brown sugar
2 tsp vanilla
2 table spoons of butter
2 table spoons of cream cheese
add milk until you reach desired consistency  

Drizzle it over the muffins, top 'em off with sprinkles 
and be sure to taste a couple to make sure they're not 
poison.

I made a second batch to take to work...
Second time around, I added chocolate chips and did a cream cheese frosting!
 When I woke up someone had already eaten FIVE. 
I think I know who it was...


Wednesday, September 5, 2012

Fudge!

Shhh! It's from the microwave..


Fudge is my boyfriend's all time favorite treat. I always thought it would be too hard to make until my Grandma gave me this awesome microwave recipe. It is really good and really easy. The best part? Nobody will know you made it in the microwave. So go ahead, tell your family and friends you slaved over it! It will be our little microwaved secret.

This recipe can also double as an awesome-ly fudgy frosting. Pour it over brownies and cakes for an extra delicious treat!


All you need is:
  •  1 pound of confectioners sugar
  • 1/2 cup of cocoa
  • 1/4 cup of milk
  • 1/2 cup of butter
  • 1 Tsp Vanilla
  • Anything else you want to add to make it yummy! (Nuts, M&Ms, Cookie Pieces, Etc.)

First, mix the confectioners sugar and the cocoa together. Add that to a microwave-safe dish of your choice. Sprinkle the milk over the mixture as evenly as you can. Cut the butter into chuncks and place them evenly over the dish. DO NOT MIX IT IN!
Microwave the fudge for 2 minutes. Take it out and mix everything together. Place the chocolate-y goodness in the fridge for about 2 hours or until it is hardened. Enjoy!


Monday, September 3, 2012

Sunday, September 2, 2012

Pop Tart Pastry


Vanilla Pop Pastry:
 1 Cup Flour
1/2 Cup COLD Butter (whole stick)
2 Tbs Sugar
Pinch of Salt
1 Tsp Vanilla
4 Tbs Cold Water

 Chocolate Pop Pastry:
 1 Cup Flour
2 Tbs Cocoa Powder
1/2 Cup COLD Butter (whole stick)
1/4 Cup Sugar
Pinch of Salt
1/2 Tsp Vanilla
4 Tbs Cold Water


Preheat the oven to 350 degrees and put the butter in the freezer. Leave the butter in the freezer for about 10 mins. Mix all the dry ingredients together. Take the butter out of the freezer and cut it into cubes. Add this to the mixture. Stir together but leave chunks of butter. Add the cold water and vanilla. Mix together but still leave some butter. Roll the dough into a ball and refrigerate for two hours. 
 
Can you tell I live with ALL boys?

 
While you're waiting take pictures of your cats.


After two hours, roll the dough onto a flour-ed surface. Roll it like you would to make cut-out cookies. Cut the dough into a large square then into smaller rectangles for the pop tarts. Once you have your pop tart shapes, pop them into the freezer for 10 mins. This will make it a lot easier to form the pop tarts. After 10 mins, lay out the rectangles and put your topping on! You can use pretty much anything you want. Next time, I want to try a banana slice and nutella! Cover it with another rectangle of dough and use a fork to form the edges. Poke Holes with a fork into the top.
 
Bake them for 15 mins or until golden brown.
 
 
I tweaked a recipe I found on Pinterest to make these! Pinterest is my love.
I made two different kinds of pastry and used 3 different fillings. I did a PB and J, Strawberry Jam and just plain PB. All three were good but I like the strawberry and vanilla pastry the best!

Saturday, September 1, 2012

Pull Apart Potatoes

Oh la la...how fancy!

I l o v e Potatoes.

Baked or fried? That is the great debate between my boyfriend and I when we decide to cook up this delicious veggie. So, when I came across this style I thought I found a great middle man. They are soft on the inside and crunchy on the outside. Not to mention very, very easy to make.
 
 
All you need is:
  •  Potatoes? Yes.
  • Olive Oil
  • Sea Salt
  • Pepper
Preheat your oven to 425 degrees. While you're waiting for the oven to heat up, pop those potatoes in the microwave for about 5 mins. Don't forget to poke holes in them! This will make them softer and easier to cut. Slice them as thinly as you can and be sure not to cut through to the bottom. Pour Olive Oil over each potato. Sprinke salt and pepper to taste and bake for about 45 mins!


Friday, August 31, 2012

Feline Friday.

Homemade Kitty Treats!

 
You will need:
  •  A (or two) can of wet cat food
  • Ziploc bags
  • Cat Nip (optional)
  • Hopefully, you have a cat.
 
This recipe is really easy and your cats will love the treats! All you have to do is mix together wet cat food and cat nip. I used my Cusinart Smart Stick Hand Blender but you can mix it by hand. Whip it until it looks like chocolate frosting! Unfortunately, it does not smell like chocolate frosting. One man's trash is another man's treasure...or cat's treasure. After you're done whipping the mixture, put it all in a ziploc bag. Just like you would with frosting, cut a small opening at the bottom of the bag. Use this to make small "dots" on your baking sheet ( I covered mine with foil for ease). Bake the dots for about 8 minutes.
While you are waiting for the first batch to bake...let your cats try the batter! Simba and Aria loved it! After eight minutes, take them out and roll the dots into little balls. I made my triangular so they were like the store-bought ones.
 
 
This is an Aria approved treat.
 
Check out this site for more treats:


Thursday, August 30, 2012

Thrift Thursday.

If you have the patience to go through racks and racks of clothes...thrift store shopping is for you. I used to be one of those people who turned their nose up at second-hand clothes.
I have seen the light and my wallet is getting used to being heavier.
You can find clothes at 1/2 the price (if not more) you would have paid for in the store. I have found many items that are still sitting on the rack (full-price too)! The ilovely tems above are all from today's treasure hunting. I bought them along with two pairs of Steve Madden high heels! All together these gems were under $40 bucks.
Day = Made.

Monday, August 27, 2012

Mani Monday.

I love nail art.
 It is a super cheap and temporary way to show your personal style! You can look online for a design to do or just find something in your own room to give you inspiration! Today I got my look from a black and white striped bag.

You can paint the design on one nail, all the nails or pick and choose. It is all up to you. I am a righty, so it is really hard to paint the design on my right hand. Sometimes I will just go for it but there are ways around it. Today, I painted the nails on my right hand a bright purple and then one nail on my left hand the same color. That way they match and I don't have to paint the whole design on my right hand.

*Nail art pens can be expensive. I always use acrylic paint instead. The brand I have only costs about 85 cents per bottle.

The finished product!

Sunday, August 26, 2012

Suzy Homemaker Sunday.

Banana Buttersotch Muffins

 
1. Preheat the oven to 375 degrees
2. Mash two very (brown = muffin gold) ripe bananas in a large mixing bowl
3.Add two cups of flour to the bananas
4.Add 1 Tbsp of baking soda
5.Mix in two eggs
6. Add 1/4 cup of butter or margarine
7.Mix in the best part...the butterscotch chips! Use as much as your butterscotch-loving n  heart desires!
8.Fill cupcake papers half way and bake for about 20 minutes
9. Eat all of them at once and gain 3 pounds...OR serve them to family and friends!
 
Ooey, goey goodness.
 
The Recipe:
  • 2 or more very ripe (and ugly) bananas
  • 2 eggs
  • 1/4 cup butter or margarine
  • 2 cups flour
  • 1 Tsp baking soda
  • 1/4 Tsp salt
  • 1 cup sugar
  • 1 Tbs vanilla
  • 1 cup butterscotch chips